


Hey all!
While I am working on random little issues with my Beat I wanted to take some time to start modifying it to make it even more awesome. First up was an attempt at a custom strut tower brace to see the ease with which I can start fabricating chassis strengthening components. My day job is as a prototype fabricator and shop manager for an industrial design firm which means I have access to a full wood and metal shop complete with CNC mill and a bunch of other toys. So I figured this would be a good test project for Beat modification.
I have found a variety of different bracing components available and every single one of them looks pretty easy and straight forward to fabricate so being the frugal guy that I am I challenged myself to start replicating them and making the Beat just a little better, one piece at a time. The choice for the front strut tower brace build was due to accessibility and ease of design. So here is how that project went!
First off I took a variety of measurements and input them into Solidworks to create a paper test template.
Then after I knew the dimensions were decently accurate I refined the shape of the base plate to accommodate the upright support structure that would bolt to the cross bar.
I then took the new templates and spray mounted them to a sheet of .12" steel (3mm). I center punched the hole locations, scored the cut lines (just in case the paper came off during cutting) and began drilling.
Once completely drilled I parted the pieces off from the larger sheet and separated them from each other to better maneuver them while cutting out the final shape.
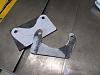
I then went to the vertical bandsaw and roughly cut out the shapes before taking them to the bench grinder and lastly a spindle sander for final shaping. This is after the first one was done.

 Reply With Quote